🛝 Slides
What is MyST?
MyST (Markedly Structured Text) is both a language and a software tool.
MyST, the language
MyST, as a language, extends Markdown.
It adds new syntax, including “roles” and “directives” that enable advanced functionality like executable code cells, callouts (also known as admonitions), and glossaries, and more. There is also dedicated syntax for citations, math, and more.
Directives are like functions that can receive Markdown content, for example an callout’s text. Roles are just like directives, except they are inline with other Markdown text.
Let’s jump right into a quick example of how this functionality works.
Example directive and role
🧠 What do we know now?
The {glossary} role enables defining terms, and the {term} role enables referencing
terms.
MySTMD, the software
MySTMD is a software tool for executing and rendering technical
documents from source in MyST or Notebook input formats to multiple output formats
including websites, PDFs, , Typst, MS Word, JATS, and CITATION.cff.
MySTMD is the software that created this website from its source code (written in MyST and Jupyter Notebook format).
Building a website with MyST
As workshop participants, you have access to CryoCloud, which provides a JupyterLab instance with MyST pre-installed. CryoCloud also comes with a special configuration for building a MyST site without the use of the terminal.
To preview a MyST site in JupyterLab, view instructions at 📝 Using MyST.
The normal way (without JupyterLab)
Because we’re working in CryoCloud for this workshop, we’ll be following the instructions above for using MyST in JupyterLab. If you’re interested to know how to use MyST outside of JupyterLab, read on!
With MySTMD installed, you can build a MyST website from source with one command:
myst build --htmlDuring development, you can also use MyST’s convenient preview server to automatically rebuild your site any time you change its content:
myst start💪 Exercise A: Build this MyST website in JupyterLab
This workshop’s materials are built with MyST. We’ll build this premade website together on CryoCloud so you can get used to the process.
Joining late? You may need to clone the workshop repository
Foo!
If you’re joining late, you may have missed a prior instruction to clone the workshop website and set up GitHub authentication.
Open a terminal in your CryoCloud JupyterLab server:
cd  # Move to your home directory
git clone https://github.com/geojupyter/workshop-open-source-geospatial.gitYou’ll need to setup GitHub authentication to push to GitHub, which is required to complete this module. Please follow the instructions at 🔐 Configuring GitHub authentication.
Navigate to the correct directory in the file browser
On the left panel, ensure the JupyterLab file browser tab (📁 icon) is selected.
Double click the folder in the file browser named workshop-open-source-geospatial.
Build the MyST website
Locate the MyST project configuration file, myst.yml, in the file browser.
Right click this file and select the top option from the menu: “Build MyST Project”.
🧠 What do we know now?
A MyST project is configured by a
myst.ymlfileIn JupyterLab, we can right-click
myst.ymlto trigger a build (requires jupyter-myst -build -proxy)
💪 Exercise B: Build a MyST website from scratch in JupyterLab
Not covered: Environment management!
Environment management is an important part of reproducible research. Always include an environment manifest or specification alongside your publication.
This exercise works as shown on CryoCloud because CryoCloud has MySTMD and many other dependencies pre-installed. When working on your own, you may encounter an error like:
Command 'myst' not foundWe highly recommend that you try pixi as a dependency manager: it’s fast, user-friendly, and makes following best practices easy or automatic.
pixi init
pixi add mystmd
pixi run myst start
Create a new empty GitHub repository
In the GitHub UI, click the + icon at the top-right. Select “New repository”.
Select your username as the owner, and enter myst-exercise as the repository name.

Leave everything else as default, and click “Create repository”.
Clone your repository
From your repository homepage’s “Quick start” menu, select “HTTPS”, then copy the URL.
On your JupyterHub server, open a new terminal.
Run these commands, replacing the placeholder with your actual repository URL:
# Change to your home directory
cd

# Clone the repository
git clone <YOUR_REPOSITORY_HTTPS_URL_HERE>Initialize your MyST project
First, change directory into your empty repository:
cd myst-exerciseNext, initialize your MyST project with configuration needed to generate a website:
myst init --project --siteCreate some content
Create a new file index.md using the JupyterLab interface:
Right-click in the empty space in the file browser.
Select “New file”.
Input the name
index.md.
Enter the following content in the file (click the copy button at the top-right of this code block):
# My document title

Hello, world!

$$
1 + 1 = 2
$$
The $$ symbols delimit a math equation, and you can write any within.
🧪 Build your site
Right-click the myst.yml file in the file browser, and select “Build MyST Project”.
Try some other MyST features
MyST offers many useful features for technical publishing, including superscripts and subscripts, keyboard input notation, abbreviations, executable code cells, callouts (also known as admonitions), math, figures, diagrams, asides, dropdowns, grids, tabs, cards, buttons, glossaries, and more.
Try out some of these features in your MyST site.
🧪 Rebuild your site
Each time you make changes, rebuild the site by clicking “Rebuild” at the top-right of the site.
Make changes, rebuild, and view the result as many time as you want!
Give your site a title
Edit your myst.yml file by double-clicking it in JupyterLab.
Uncomment the title key and populate a title for your site, e.g. “My site”.
Your config file should now look like this:
1 2 3 4 5 6 7 8 9 10 11 12 13 14 15# See docs at: https://mystmd.org/guide/frontmatter version: 1 project: id: 60e9ac52-956d-4811-800a-68be74a85174 title: "My site" # description: # keywords: [] # authors: [] github: https://github.com/mfisher87/myst-exercise # To autogenerate a Table of Contents, run "myst init --write-toc" site: template: book-theme # options: # favicon: favicon.ico # logo: site_logo.png
🧪 Rebuild your site
Save and rebuild your site.
Replace “Made with MyST” text
“Made with MyST” is the default text that appears at the top of your site if
you don’t provide a logo or logo_text.
We can update the text at the very top to replace “Made with MyST” by editing
myst.yml again and setting site.options.logo_text.
First, uncomment options:, then add a line underneath it to set logo_text.
Indentation is important.
Your config file should now look like this:
1 2 3 4 5 6 7 8 9 10 11 12 13 14 15 16# See docs at: https://mystmd.org/guide/frontmatter version: 1 project: id: 60e9ac52-956d-4811-800a-68be74a85174 title: "My site" # description: # keywords: [] # authors: [] github: https://github.com/mfisher87/myst-exercise # To autogenerate a Table of Contents, run "myst init --write-toc" site: template: book-theme options: logo_text: "My logo text" # favicon: favicon.ico # logo: site_logo.png
🧪 Rebuild your site
Save and rebuild your site.
🧠 What do we know now?
myst.ymlcontrols what the site looks like, including the title, logo, logo text, and more.The
index.mdfile is the “home page” for our site by default.The development loop for a MyST site in JupyterLab looks like:
Right-click
myst.ymland “Build MyST Project”In the newly opened browser tab, you can view a preview of your MyST site.
Change your site content by editing
myst.yml, Markdown files, or Notebooks.View the results of those changes by clicking “Rebuild” at the top of your site preview.
Building a PDF with MyST
MyST enables building a PDF from the same source as you built your website.
Some features are web-specific, however, and won’t be rendered in an output PDF.
Let’s try it out!
💪 Exercise C: Render a PDF from the same source as your website
Attempt to build our current project as PDF
Building PDF(s) from a MyST project requires one command in the terminal:
myst build --pdfConfigure the frontmatter to allow PDF export
To tell MyST that we want a PDF export for a specific document, we need to define frontmatter.
While we’re here, let’s also set some other metadata like the document’s author.
Add to the top of index.md:
1 2 3 4 5 6 7 8 9 10 11 12 13 14 15 16 17 18--- authors: - name: "Your name" affiliations: - "Your employer" email: "your-email@example.com" github: "your-github-username" # Optional: Do you have an ORCID? # orcid: "0000-0000-0000-0000" export: - format: "typst" template: "plain_typst_book" output: "paper.pdf" --- # My document title Hello, world!
On quoting in YAML, a rant
YAML is intended to be a human-friendly data format. There are many ways that it excels at this goal, and in other ways, it introduces pitfalls that are easy to fall in to.
A single rule will help you avoid many of these pitfalls: always quote strings in your YAML.
Example: Upgrading the Python version
requires_python: 3.9☝️ Looks good to me, and it works fine. I’ll just upgrade that to 3.10...
requires_python: 3.10🙅 This value isn’t a string, it’s a number, so it evaluates to 3.1.
requires_python: "3.10"✅ The only way to get the result you want is to quote the string.
Example: ISO country codes
country_code: gb☝️ Looks good to me, and it works fine. I’ll just update my program to process data for Norway...
country_code: no🙅
This value isn’t a string, it’s a boolean, so it evaluates to false.
country_code: "no"✅ The only way to get the result you want is to quote the string.
Save yourself the pain: always defensively quote your YAML strings.
There are many more ways YAML can be confusing. There are a lot of special rules to remember! For more, check out The YAML document from hell and https://noyaml.com/.
🧪 Build the PDF
To build the PDF, try myst build --pdf again.
Try opening the PDF!
Double-click paper.pdf in the JupyterLab file browser.
Other PDF templates
This document was rendered with the "plain_typst_book" template.
Other PDF template options are available!
Try running myst templates list --typst to see a list of available templates.
More information is available on the official MyST PDF-building documentation.
🧠 What do we know now?
MyST documents can be built to multiple output formats, including PDFs.
Frontmatter is YAML metadata on a Markdown document that can tell MyST which documents should be built as PDF.
Typst can be used as an alternative document engine to for rendering PDFs by specifying
export.format: "typst"in the frontmatter.If you opened the collapsed section on quoting YAML, you know the author of this document has been burned too many times. Quote your strings! 😁
Hosting your website for free
There are many platforms for hosting a website (and PDF!) for free. We’ll discuss some common options for open source projects.
GitHub Pages
GitHub Pages is, as it sounds, a GitHub-native solution for hosting web pages. It doesn’t offer any advanced features, it only enables building a website from a GitHub repository.
Pages are built using GitHub Actions.
ReadTheDocs
ReadTheDocs is a community service for building and hosting webpages, most commonly software documentation. It provides advanced functionality like website previews for Pull Requests, multi-language builds, and multi-version builds.
It uses its own unique file format for specifying build processes.
💪 Exercise D: Publish your paper and website to GitHub Pages
We’re going to use GitHub Pages because it’s more straightforward to configure. We recommend trying out ReadTheDocs if you need more advanced features!
Update repository’s GitHub Pages settings
Open your repository URL in your browser
Click the “Settings” tab towards the top
Select “Pages” from the left menu
Change the “Source” dropdown to “GitHub Actions”
Add GitHub Actions configuration file
Now that we’ve set up our repository to build our website using GitHub Actions, we need to define the build process in a configuration file.
MyST can do this automatically!
In the terminal, from your myst-exercise project directory:
myst init --gh-pages🧪 View the action results
After committing and pushing the GitHub Actions configuration file in the previous step, we can view the build that was triggered.
Visit your repository URL in GitHub. Click the “Actions” tab at the top.
Click on the workflow run shown on this page. If it succeeded, you should see a node named “deploy” displayed on the page:
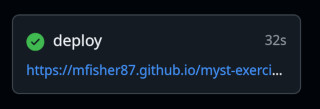
Click the link in the “deploy” node to view your built website.
If your deploy failed, click the “deploy” node to view the error logs. See if you can solve the error on your own, and let an instructor know if you need help!
Display your GitHub Pages URL on your repository homepage
GitHub offers a convenience feature to enable you to view your GitHub Pages URL on the homepage of your GitHub repo.
Visit the URL for your GitHub repo homepage. Towards the top-right, click the cog/gear icon (⚙️).
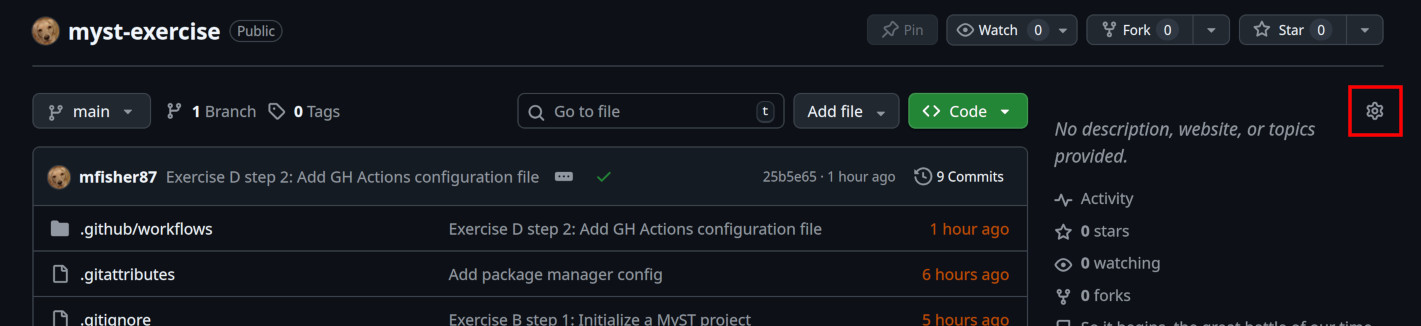
Finally, check the “Use your GitHub Pages website” checkbox, and then click “Save changes”.
🧠 What do we know now?
GitHub repositories need some initial setup in the web interface to publish a MyST site built in GitHub Actions.
MyST can do most of the work of configuring GitHub Actions deployments for us with a single command:
myst init --gh-pages.We can see deployment progress and results in the GitHub repository’s “Actions” tab.
MyST will automatically build PDFs when building a website, and generate a download link on the relevant page.
A GitHub repository can display a convenient link to the related GitHub Pages website.
Getting a DOI
A DOI can uniquely identify and track your research products, enabling easy citing and tracking of citations. DOIs can even be versioned, enabling citations to reference a research product at a specific point in time.
DOIs can be associated with your unique academic identity through the use of an ORCID.
We can automate the production of DOIs with GitHub and Zenodo (a free DOI registrar developed and operated by CERN).
💪 Exercise E: Get a DOI for your published content on GitHub
Create an ORCID
Visit the ORCID registration page and create an account.
Enter your personal email as your primary email. Be sure to also enter your institutional email as an additional email. You can more emails after you register.
Sign up for Zenodo
Visit the Zenodo signup page and sign up with either your GitHub account or ORCID. We recommend using GitHub, as you’ll need to link your GitHub account either way.
Link your GitHub account
If you didn’t signup with GitHub, you’ll need to link your GitHub account.
After you’ve signed in, click the username dropdown at the top-right of the Zenodo interface.
On the left panel, select “Linked accounts”.
On the GitHub row, click “Connect”. You may be prompted to log in, then you’ll be prompted to accept some dialogs.
Enable auto-DOI for your repository on Zenodo
After you’ve signed in to Zenodo, click the username dropdown at the top-right of the Zenodo interface.
On the left panel, select “GitHub”.
Click “Sync now”. It may take a moment to complete the sync.
Help, I received a 504 error!
504 error!If you receive a 504 error,
this is common for users with large numbers of public repositories.
Wait a few minutes and refresh the page; eventually your repository list will be updated
Find your repository in the list and flip the switch for that repository to “ON”.

Create CITATION.cff
A CITATION.cff file is the project metadata that enables Zenodo to populate a DOI.
MyST can generate a CITATION.cff for you!
But it needs to be told which documents to use to populate this metadata.
Edit index.md to add another export format of "cff":
1 2 3 4 5 6 7 8 9 10 11 12 13 14 15 16 17--- authors: - name: "Matt Fisher" affiliations: - "Schmidt Center for Data Science & Environment" - "University of California, Berkeley" email: "matt.fisher@berkeley.edu" github: "mfisher87" orcid: "0000-0003-3260-5445" export: - format: "typst" template: "plain_typst_book" output: "paper.pdf" - format: "cff" --- # My document title
Now we can build our CITATION.cff file with the command:
myst build --cffAs your project grows and changes, you can regenerate this file by repeating that command.
You can also edit your citation file by hand -- it’s in the YAML format, which may be familiar to you now! Check out the full CFF specification to see what kind of information you can populate!
Create a GitHub release
Zenodo creates DOIs only when you create releases in GitHub.
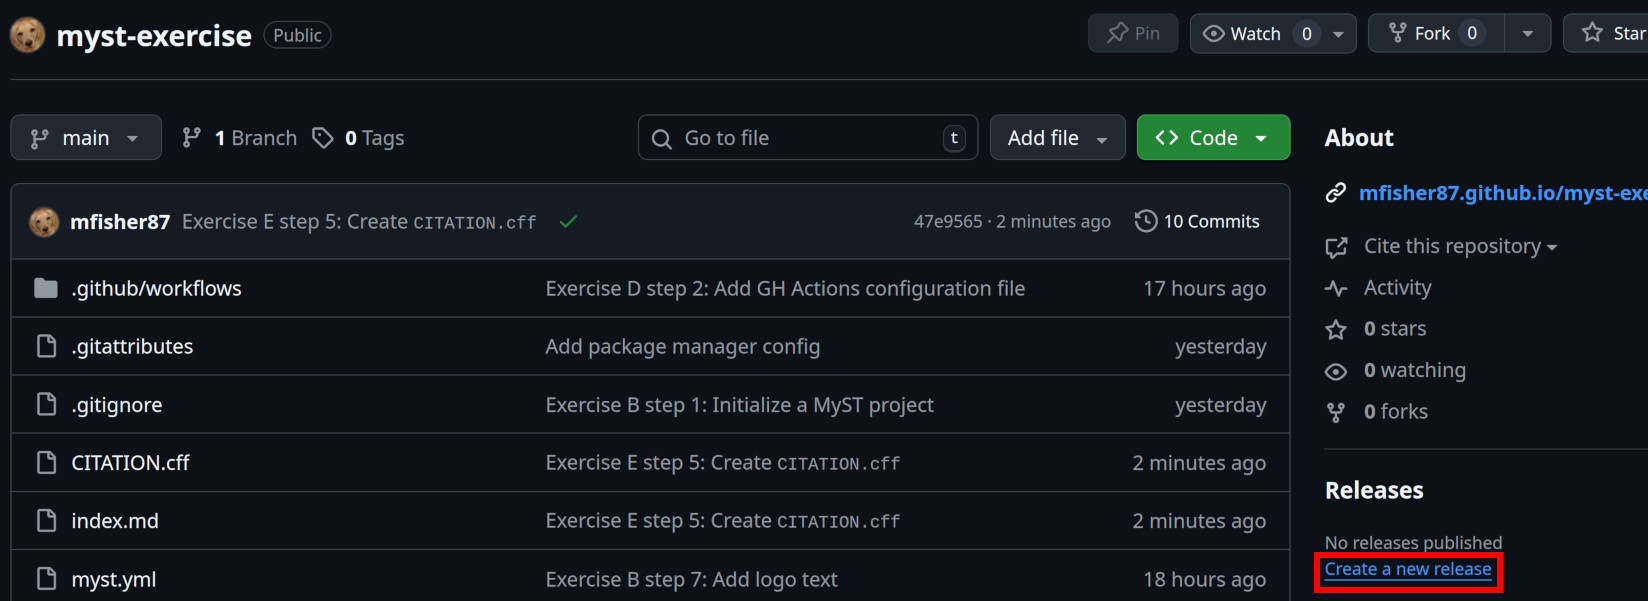
Visit the URL for your GitHub repository’s homepage.
Click the “Create a new release” button on the right sidebar.
Click the “Tag” dropdown and click “Create new tag”.
We’ll use tags to create an ascending numerical sequence for our releases.
For simplicity, let’s enter the date in YYYY.MM.DD format, e.g. 2025.12.18.
Versioning schemes
There are many versioning schemes to choose from. The one we suggested above is called “CalVer” or “calendar versioning”.
You may want to try an extremely common versioning scheme called “SemVer” or “semantic versioning” enables embedding information about the implications of upgrading to any given version in the version number itself.
Give your release the title “Initial release”.
You don’t need to enter anything in the “Release notes” field, but we recommend using the “Generate release notes” button as a starting place.
“Generate release notes” only generates one line of text!
This feature uses GitHub Pull Requests (PRs) to generate a list of changes. If you don’t use PRs, you will only see a “Changelog” link, this is normal.
Finally, click “Publish release”.
Zenodo will automatically generate your DOI now.
Add a badge to your README
Zenodo also automatically generates a beautiful DOI “badge” you can display on your repository’s README or anywhere else on the web.
To use the badge, click the username dropdown at the top-right of the Zenodo interface, and select “GitHub”.
Locate your repository on the list of enabled repositories and click on the blue DOI badge:
Copy the “Markdown” code and paste it into a new README.md file in your repository:
1 2 3[](https://doi.org/10.5281/zenodo.17716242) # My exercise from the AGU workshop "Open Source Geospatial Workflows in the Cloud"
Writing a useful README
The README is the first thing that a user sees when they interact with your repository.
Check out The Turing Way’s README guide for some thoughts that may help you make your README more useful.
🧠 What do we know now?
An ORCID uniquely identifies ourselves
A DOI uniquely identifies our publication
A DOI can be associated with an ORCID
A DOI can help protect us against scooping and more accurately and fairly reflect all contributions to the work
Zenodo can “auto-DOI” a GitHub repository
DOIs are automatically generated from GitHub Releases
DOIs can be updated over time with changes by creating new GitHub Releases
We can display our DOI in GitHub with Markdown in our README
🎉 Congratulations, you’re done!
Great job finishing this module. If you’d like continued support in applying these skills to your work, please join the MyST community on Discord and/or ask questions in the CryoCloud Slack!